For thos who are unfamiliar, the "As You Wish" movement headed by Art Andrews of the Dented Helmet and The RPF is raising money for the Make A Wish foundation by having a large group of talented artists make unique helmets from a raw Boba Fett helmet cast which will all be auctioned off at Star Wars Celebration in Orlando this year. There have been so many awesome and inspiring builds from this fundraiser that I wanted to make something along those lines also. This is not affiliated with the "As You Wish" fundraiser, just inspired by it. Maybe one day I will be lucky enough to be asked to participate. Here is my work in progress of my Boba Fett, Iron Man crossover, I will post another full blog on it when I finish it. Progress can be seen on my fanpage www.facebook.com/VectorSigmaCreations
I am a prop/replica artist who enjoys making things from my favorite movies and video games for fun.
Wednesday, July 18, 2012
Friday, June 29, 2012
The science is done, and I've made a new gun, for the people who are still alive !
I started off making the barrel pretty much how Volpin made his, using pvc and Apoxiesculpt
For the rear chamber, I glued together 2- 4" couplings and cut them down the middle. I made it an oval tube by adding a strip of styrene on each side as seen here
I made the rear shell out of insulation foam that was glued together into a block, then sculpted into the shape I need with a knife and 60 grit sandpaper. I sealed this with Smoothcast resin before skimming it in bondo and sanding smooth
The barrel "nozzle" was made from a pvc reducer and a 2" coupling. the center band and lip was formed with Apoxiesculpt. The center detail was cut from an end insert for a roll of butcher paper !
I made the center light tube from an acrylic rod for rolling out clay, bought from Michael's and made the caps for mounting the l.e.d's from pvc adapters.
I made the rear panel fron 1/4" acrylic, painting the inside surface black. I bought the drawer pull as a handle from Lowe's.
I cut the claws out of styrene by hand
The ends of the claws were made from styrene also, the gaps filled in with Apoxiesculpt
I mounted the front led board into the barrel nozzle, and the speaker into the main barrel body
here is a mock up with trim plates installed
All put together, I used bendable wire as armature for the rubber tubes to help them keep shape
I still need to print out the proper decals for it
The lighting and sounds came from a kit from a member of the RPF named Crix (not Volpin), It has startup, shutdown and the 2 different sounds for each color, along with an idle sound.
Wednesday, May 23, 2012
Finally ! I'm making a Portal gun !
I haven't posted much lately so I wanted to offer up a teaser of my latest project. I know there are alot of Portal replicas out there already, and I know my humble build is nothing compared to such awesome builds such as Throwing Chicken's and Volpin's builds, and with the release of the Neca replicas, It's almost pointless to make one. However, I wanted to make one for myself as a guage of my skills compared to other very talented prop artists. So far it has been a humbling experience, but it is also helping me achieve a new level. This is what I have so far, and I will be sure to write up a full post when it is done !
Sunday, April 22, 2012
Go Wolverines !!
I just thought I would share a statement from my friends at The Replica Prop Forum about the hacking incedent.....
On Jan 5, 2012, our domain was stolen. On April 20, 2012, we finally got it back.
On Wednesday, April 25, 2012 we will transition back to therpf.com.
If you visit thereplicapropforum.com on or after that date, you will be automatically redirected to therpf.com Pass the word ! All is clear !!
Thursday, March 1, 2012
Sailor Jupiter's Diadem
My sister really wanted me to make this for her costume she plans, so here it is, I really didn't need much time for it, probably less than 2 hours total
I first made a pattern on cardboard. I never use corrugated cardboard, I get sheets of this stuff from work that is like cereal box cardboard, only much thicker. It is much easier to shape into curves smoothly and is great for patterns.
I used the pattern to make cut the shape out of Sintra, then after sanding the edges smooth and shaping it in near-boiling water, I glued strips of half-round styrene to the edges to make it a little more ornamental. I tried at first shaping the sintra with my new heat gun, but even at low setting it wanted to buckle the Sintra.
This is the basic Diadem built, I changed the green gem to the oval one in the final picture as it was more accurate. after a few touch ups with some spot putty, it was ready for paint.
And of course the finished product, after applying the gold paint, I gave it 2 coats of clear, and glued the gem on.
I probably should have brushed the dust off of it before taking the picture, but you get the point !
I first made a pattern on cardboard. I never use corrugated cardboard, I get sheets of this stuff from work that is like cereal box cardboard, only much thicker. It is much easier to shape into curves smoothly and is great for patterns.
I used the pattern to make cut the shape out of Sintra, then after sanding the edges smooth and shaping it in near-boiling water, I glued strips of half-round styrene to the edges to make it a little more ornamental. I tried at first shaping the sintra with my new heat gun, but even at low setting it wanted to buckle the Sintra.
This is the basic Diadem built, I changed the green gem to the oval one in the final picture as it was more accurate. after a few touch ups with some spot putty, it was ready for paint.
I probably should have brushed the dust off of it before taking the picture, but you get the point !
Monday, February 6, 2012
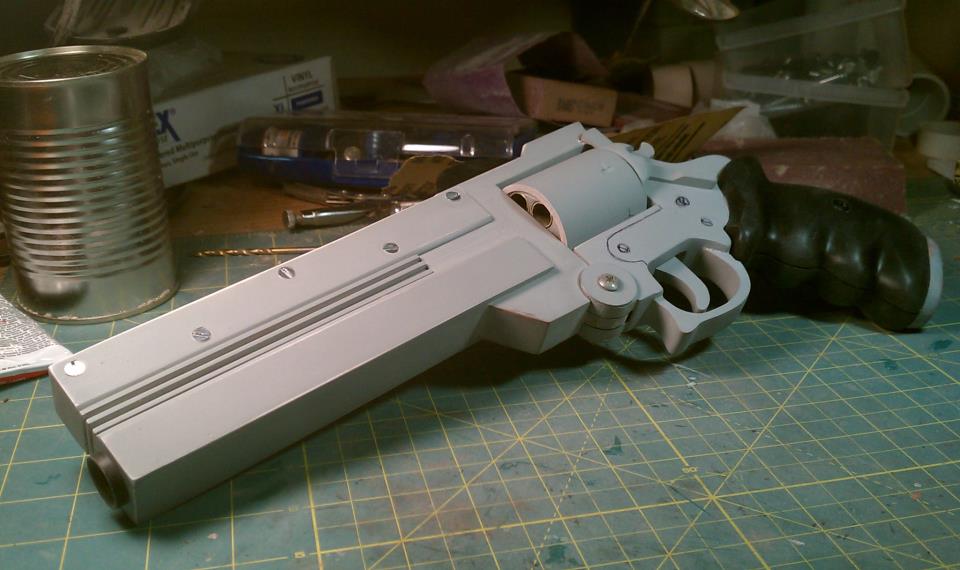
Vash the Stampede's Longcolt .45 from Trigun Replica
Here is my write up on my latest build, Vash the Stampede's Longcolt .45 from Trigun ! I have always wanted one of these since watching the anime, unfortunately, the only kits available that I could find are horrible, and most of them are recasts, So I made my own ! I started off by printing up a picture of the gun to scale and making patterns out of cardstock. I used mostly 1/4 MDF layered together for most of the gun cutting it and building it up in layers, kinda like an MRI scan. I sealed all mdf with shellac and sanded smooth before molding it and casting the frame of the gun in Smooth-on's Smoothcast 32 series urethane resin.
I used Fevereon prop's trigger/hammer design from a gun she built as the basis of my design for a moving trigger/hammer assembly. I built the barrel out of a top and bottom piece of wood, with the barrel heat sinks sandwiched in between. the heat sinks were made from various widths of styrene strips glued together. for some reason I cannot find any in progress pics of this step :(
I made the cylinder pretty easy, I found a pvc pipe that was already the right diameter. I found a nice selection of various diameter brass tubing at the hobby store and cut six pieces that fit nicely inside the pipe.
I filled it in with Apoxiesculpt and sanded it smooth. I have some brass pipe that fits perfectly inside the cylinder tubes to make some bullets with
Next up was the trigger guard, which I cut out of mdf with my tabletop scroll saw, sealed with shellac, and sanded smooth. Sealing the mdf with shellac keeps it from tearing up while sanding, and makes a nice smooth, non-porous surface for painting and molding I have seen where some prop builders paint on a coat of super glue for the same purpose
Vash's gun is a top break model, and reloads similar to a shotgun, there is a thumblever on both sides that open and closes a latch on the top of the revolver. I made this out of styrene, as I also did with the top rail which the latch attaches to.
For the grips, I used 5 layers of 1/4 mdf, I used double sided tape to keep them together while I shaped them by hand with a dremel, tabletop belt sander, and files and sandpaper.
The gip goes on in 2 halves and held on by screws, just like a real gun. I coated the grips with textured rustoleum paint,(a trick learned from Volpin Props), and then coated that with Plastidip spray on rubber.
So, here are a few more pics of the whole gun,
Thanks for looking at my build !
Sunday, January 15, 2012
The Replica Prop Forum hacking incedent
Just in case anyone reading this has not been told yet, The Replica Prop Forum's original site was hacked, stolen, and replicated. It still looks the same and is mostly functional, but is now hijacked by Russian Hackers posing as the real thing. The staff of the REAL forum has moved to www.thereplicapropforum.com until they can re-secure the original website again. And don't forget to change your passwords !!
Subscribe to:
Posts (Atom)