Thursday, March 1, 2012

Sailor Jupiter's Diadem

My sister really wanted me to make this for her costume she plans, so here it is, I really didn't need much time for it, probably less than 2 hours total

I first made a pattern on cardboard. I never use corrugated cardboard, I get sheets of this stuff from work that is like cereal box cardboard, only much thicker. It is much easier to shape into curves smoothly and is great for patterns.
I used the pattern to make cut the shape out of Sintra, then after sanding the edges smooth and shaping it in near-boiling water, I glued strips of half-round styrene to the edges to make it a little more ornamental. I tried at first shaping the sintra with my new heat gun, but even at low setting it wanted to buckle the Sintra.


This is the basic Diadem built, I changed the green gem to the oval one in the final picture as it was more accurate. after a few touch ups with some spot putty, it was ready for paint.


And of course the finished product, after applying the gold paint, I gave it 2 coats of clear, and glued the gem on.
I probably should have brushed the dust off of it before taking the picture, but you get the point !

Monday, February 6, 2012

Vash the Stampede's Longcolt .45 from Trigun Replica

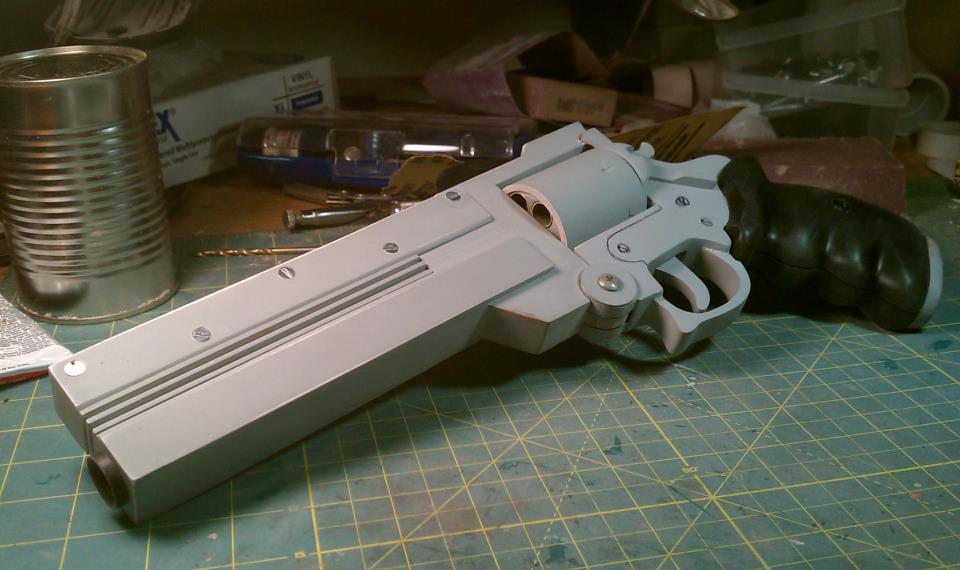
Here is my write up on my latest build, Vash the Stampede's Longcolt .45 from Trigun ! I have always wanted one of these since watching the anime, unfortunately, the only kits available that I could find are horrible, and most of them are recasts, So I made my own ! I started off by printing up a picture of the gun to scale and making patterns out of cardstock. I used mostly 1/4 MDF layered together for most of the gun cutting it and building it up in layers, kinda like an MRI scan. I sealed all mdf with shellac and sanded smooth before molding it and casting the frame of the gun in Smooth-on's Smoothcast 32 series urethane resin.


I used Fevereon prop's trigger/hammer design from a gun she built as the basis of my design for a moving trigger/hammer assembly. I built the barrel out of a top and bottom piece of wood, with the barrel heat sinks sandwiched in between. the heat sinks were made from various widths of styrene strips glued together. for some reason I cannot find any in progress pics of this step :(
I made the cylinder pretty easy, I found a pvc pipe that was already the right diameter. I found a nice selection of various diameter brass tubing at the hobby store and cut six pieces that fit nicely inside the pipe.


I filled it in with Apoxiesculpt and sanded it smooth. I have some brass pipe that fits perfectly inside the cylinder tubes to make some bullets with

Next up was the trigger guard, which I cut out of mdf with my tabletop scroll saw, sealed with shellac, and sanded smooth. Sealing the mdf with shellac keeps it from tearing up while sanding, and makes a nice smooth, non-porous surface for painting and molding I have seen where some prop builders paint on a coat of super glue for the same purpose
Vash's gun is a top break model, and reloads similar to a shotgun, there is a thumblever on both sides that open and closes a latch on the top of the revolver. I made this out of styrene, as I also did with the top rail which the latch attaches to.
For the grips, I used 5 layers of 1/4 mdf, I used double sided tape to keep them together while I shaped them by hand with a dremel, tabletop belt sander, and files and sandpaper.
The gip goes on in 2 halves and held on by screws, just like a real gun. I coated the grips with textured rustoleum paint,(a trick learned from Volpin Props), and then coated that with Plastidip spray on rubber.

So, here are a few more pics of the whole gun,


Thanks for looking at my build !


Sunday, January 15, 2012

The Replica Prop Forum hacking incedent

Just in case anyone reading this has not been told yet, The Replica Prop Forum's original site was hacked, stolen, and replicated. It still looks the same and is mostly functional, but is now hijacked by Russian Hackers posing as the real thing. The staff of the REAL forum has moved to www.thereplicapropforum.com until they can re-secure the original website again. And don't forget to change your passwords !!

Sunday, September 18, 2011

EE3 Boba Fett style blaster pistol built from scratch

I decided on doing a full costume for next year of a Mandalorian Assasin/warrior. My first item to build was the pistol I will have in a thigh holster. I modeled it after Boba Fett's EE3 blaster rifle from Return of the Jedi, which is made from a Webley and Scott flare gun. I started off basically making a replica of the flaregun, and then turning that into the blaster much like the original propmakers for the movie.

I downlaoded and printed a blueprint for the original Webley flaregun made by Alan Sinclair (Wizardoflight) on the Denated Helmet forum and used that for measurements and reference. I cut the main frame of the gun from mdf and the barrel from a piece of pvc pipe.


next I cut the hand grip sides from some 1/4 inch mdf and glued them on, I think in the future with a gun grip, I will finish the grips seprately and attach them later in the build.


using a pattern I made from a piece of cardboard, I cut out the reciever shell from sintra, heated it up some and wrapped it over the barrel, gluing it in place.


I rounded off the edges of the handgrip


I cut another strip of sintra and formed it to a similar shape as the bluprint for the trigger guard


The trigger and hammer parts were cut from.... can you guess... SINTRA ! thet were shaped accordingly and glued into notches I made in the gun frame. after that, it pretty much looked like a Webley and Scott flaregun !

Up to this part in the build I only have a couple hours in this, so things are going smooooooooth !

i used Bondo to finish the reciever shell and fill in the rear of the gun.


me holding the pistol for scale


Next, I decided to lengthen the barrel rather than adding something over it, which was easy enough !


I then decided to use my x-acto knife in an unsafe way.


After applying first aid, (paper towel and duct tape) I moved on. I cut some thin strips of sintra for the barrel fins with my new(ish) band saw. I'm so glad I didn't have to cut those by hand, especially after cutting myself already. I marked out even spacing around the barrel to line these buggers up right the first time.


After that, it got some touch up sanding and a coat of primer


I painted it mettalic silver first, so that after the final paint I can weather/damage it by scraping and sanding down to the silver layer, giving it the bare-metal look. I coated it in a gunmetal gray charcoal, added some grip detail using self sticking black foamies, and made the barrel tip from a conical shaped rubber foot I found digging though my junk boxes. I also took an old cheap rifle scope and cut it down shorter for the pistol. I notice that a lot of pistols in the Star Wars universe have scopes for some reason and I felt staying with tradition would help make this custom blaster more recognizable.


In that last picture I started light weathering and a light inkwash in the details to age the blaster some. I will add a matte clearcoat to it later to dull the finish down some as it is too shiny. Thanks for reading !

Saturday, September 3, 2011

Scarlet Witch costume headpiece

So this is my first comissioned replica ! A friend in Canada wants to cosplay as the Scarlet Witch and I was asked to make part of the costume, This was a really easy piece and was made with scrap stuff I already had so the write up will be short.
The above image does not belong to me and was not created by me, it is a sample found through a google image search and used as a reference in my project.

I was given some basic measurements and guessed at alot of it , I started with a cardboard pattern that was bent and tested to get the shape right.


 I then used the pattern as a template for the real thing made from Sintra which was formed to shape in boiling water, then cooled under the faucet to set it.


I used a spare adjustable headband from an L.E.D headlamp that I used on my Predator mask build. I painted it a deep red first, wet-sanded, then top coated some bright red spray paint before sealing it with a clearcoat.


Thursday, August 11, 2011

Optimus Prime's Ion Blaster rifle Build

I wanted to build a Large replica of Optimus Primes ion blaster, one, because I'm a HUGE tranfsormers fan, and two, I wanted to build some kind of weapon/rifle. I looked online and couldn't find a single decent fan-made version so I set out to do my own! I used no tutorials or designs by anyone else, everything was planned by myself.

I started out with a trip to the plumbing section at Lowe's and got some 4" couplers, 4" pipe, 3" pipe, and a couple reducers, I had to assure the cashier that I was NOT building a potato gun ! LOL !

I used the Masterpiece Optimus' Ion Blaster for reference, It represents an updated version of the G1 rifle

The main chamber of the rifle started out as a 4" coupler and a reducer glued together, then using a pattern I made from cardboard, I cut the piece of sintra to curve around it for the raised part. I then smoothed it out with bondo.


The barrel tip is a pvc adapter that I thought looked just nifty


For the barrel ridges in the middle of the gun, I cut the basic shape I needed and formed them with Sintra. 


I then glued them in place and smoothed out the joints with bondo and spot putty.


I cut the hand grip and clip from MDF and glued the outside detail, cut from 1/4" MDF to the outside.


For the raised lines in the grip and clip, I used Sintra yet again. I love this stuff and it has been very useful in most of my builds !

I also cut the shapes that go on top of the barrel out of mdf, then drilled them out hollow with my tabletop drill press.


I made the "stock" out of poplar, then made the side panels out of, you guessed it..... Sintra. To make the bend nice and straight, I just scored a line in it with a sharp hobby knife, then I just bent it back, filling in the gap later with spot putty.


I used mdf pucks I cut out and glued together to make the piece joining the 2 front barrel parts , I tapered the 2 middle pucks and smoothed them with bondo to give it the look that the front barrel tube tapers into the inside of the 2cnd barrel tube.


Here I have it mocked up, I attached the grip, and the clip with a wooden dowel and epoxy, I made the front barrel ridges out of bondo. The cut-out square in the main chamber was made by cutting out a square, and then inserting a 3" pvc pipe inside which fit perfectly !

I used my Dremel tool to cut the grooves in the top of the barrel, and a 1" hole saw along with the dremel the cut in the "screwhead" detail on the bottom-sides of the stock., I Glued everything together with either 2 part epoxy or pvc glue, the latter puts of some HORRIBLE fumes so it is to be used outside for sure. I filled in every possible crack or gap and made everything as straight as can be because I plan on making casts of this to sell, I may even add electronic sounds and lights later to one of the casts.

I hung the rifle up outside and gave it a good coat of primer, I used OPTIMUS primer, lol .(get it?)


and here is the rifle now, ready for a final sanding before making a mold ! It's 3 feet long total and weighs under 10 lbs, which isn't bad considering the heavy materials. Of course the resin casts will be much lighter ! In the next pic, you can see a picture of the actual toy I used as reference


I will paint this eventually, but my friends over at The Replica Prop Forum  suggest waiting until after I make the molds, so it doesn't mess up the paint.


I would also like to give thanks to the creator of Volpin Props whose excellent write ups and helpfulness with others have both helped inspire me and teach me some tricks. Also my best friend Alan who is so wizard, he is so supportive and always helpful !


UPDATE !!  Since it's gonna be a little while before I can make a cast of this beast , I decided to paint it anyway, unfortunately during paint prep, the blaster took a 4 foot drop to the concrete and broke into 3 parts, and also smashed the rear part of the rifle.

after shaking off the severe depression of having weeks work of hard work obliterated, I pushed on and fixed it. I even modded it to disassemble into 2 parts to make casting and transporting easier.

and here it is with paint !